There is just such a tool. It's called Selenium IDE.
A simple script recorded with Selenium IDE
IDE is an acronym for Integrated Development Environment. Using Selenium IDE, instead of having a program over here talking to a remote controller over here that drives a browser in a third place, the entire application runs inside the web browser. To do that, Selenium IDE was built as a browser plug-in for FireFox. Let's take a look at the software in-action, after I have recorded a simple script:
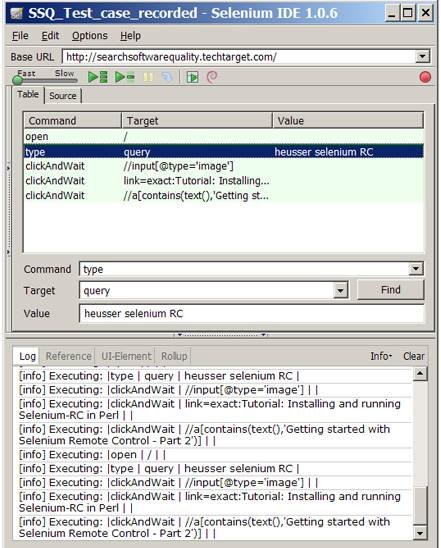
This will all be explained in more detail below, but I wanted to give you a quick look at what your Selenium RC screen will look like when we're through. To record this, all I did was start Selenium IDE, type http://techtarget.searchsoftwarequality.com (enter), and use the site to search for my tutorial on Selenium RC. With the test recorded, I can replay that test by clicking the green go button. The 'Base URL' for the test is SearchSoftwareQuality.com so we don't see that mentioned in the open method, but above in the Base URL field. With Web testing, often it can be tricky to obtain an element's id. However, Selenium is able to capture the ids in the target field as the tool is recording actions taking place in the Firefox browser.
One thing the test doesn't do (yet) is actually confirm any text on the screen -- it drives the browser, but doesn't inspect it. We'll talk about that later.
Before we can do that, let's talk about how to install Selenium. Then I'll cover more on how to use it effectively, and a little bit on how to save, re-use tests, and make test suites with the tool.
Installing Selenium IDE
We'll start by going to the openQA download page, which you can find at http://seleniumhq.org/download and clicking on the link to download Selenium IDE. That will take us to the Selenium IDE Add-On Installer:

Now click the "Install Now" button to get started, followed by "Restart FireFox."
You should see a note that the new Add-on was installed, and that's it. You can start Selenium IDE by clicking Tools->Selenium IDE from your Firefox browser.
It's that simple.
Now let's walk through creating that first test together in more detail; you may want to print this page out and follow along.
Recording an Effective Test
- Open the IDE through Tools->Selenium IDE.
- When the window pops up, mouse over the red button on the top right. It should say "Now recording." If not, click the button to start recording.
- In your browser, go to www.searchsoftwarequality.com.
- Look at the title of the web page; the words in the blue bar at the very top-left of the screen.
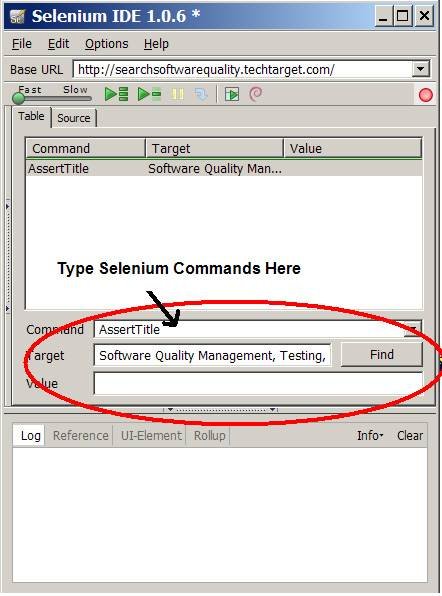
- Let's assert that title comes up when we start testing. So click on the white box to add a command:
-

1.)Then click on the Command textbox and type in "assertTitle" into the command window and "Software quality management, testing and QA resources - SearchSoftwareQuality.com" (which should be showing in the Firefox Title Bar) into the Target textbox.
2.)Now go back to the browser, click on the search textbox. Type in "Heusser Selenium RC" and click search.
3.)This brings us to a search results page. In steps 9 and 10, we'll add in checks for two recent Selenium articles that I wrote.
4.)Click on the next blank command line in the Command Table. This is necessary in order to add a new command. Add an assertElementPresent command for "link=Tutorial: Installing and running Selenium-RC in Perl"
5.)Add a second assertElementPresent command for "link=Getting started with Selenium Remote Control - Part 2."
6.)Go back to the main browser window and click that first link to go to "Tutorial: Installing and running Selenium-RC in Perl." The action of clicking the link will both take us to that actual page, and "record" the event in Selenium IDE, adding it automatically to the test case.
Now we're on a browser page for the first tutorial. Let's make sure at least some actual text from the article appears. To do that:
7.)In the Selenium IDE window, click on the next blank command line. Then enter the command "assertTextPresent" and add "Used in conjunction with Selenium's online tutorials" added to the Target text box.
-
If you followed these directions, click the red button to stop recording, and you should have
something like this:
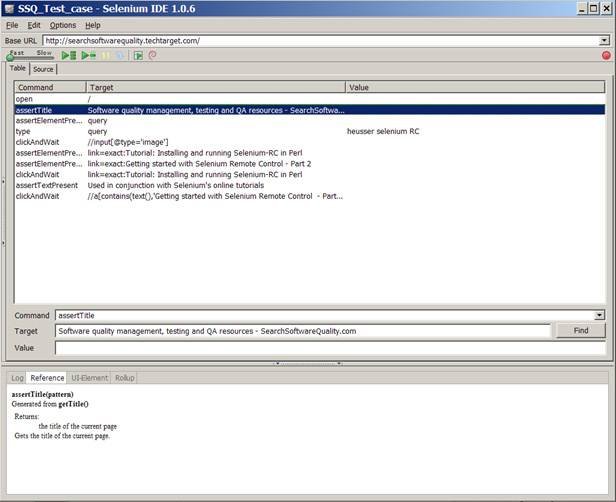
The slash at the top is actually a command to open the 'Base URL,' which we can see at the very top is our website. This is a sort of shorthand, so that we can skip the http colon slash slash domain-name dance for every open command. Without the full path, Selenium assumes it is part of the Base URL. In our example, we typed in SearchSoftwareQuality.com and hit enter, causing that Base URL to be set.
Now that the test is recorded, you can either click one of the green play buttons (we only have one test right now; the test is the suite) or click at the top of the command list and click the step in button to run one test at a time. If you get errors, it's likely that you called assertElementPresent when it should have been assertTextPresent, or you made a typo in the check or command. You can compare your test to this one to look for differences.
In addition to checking for text and links, Selenium has a host of commands. Most of them, such as clicks, checks, and selects, can be recorded automatically with the IDE. One popular command is waitForElementPresent (element_name) which can be especially important when waiting for Javascript elements to populate. The commands are extensive; this list of common Selenium commands should get you started.
Also, if you end at a different place than you start, make sure you begin with an "open" command with a location of "/" and that the base URL is the place to start. If the test misses this for some reason, just add the command at the bottom and drag it to the top.
Saving Tests, creating and re-suing suites
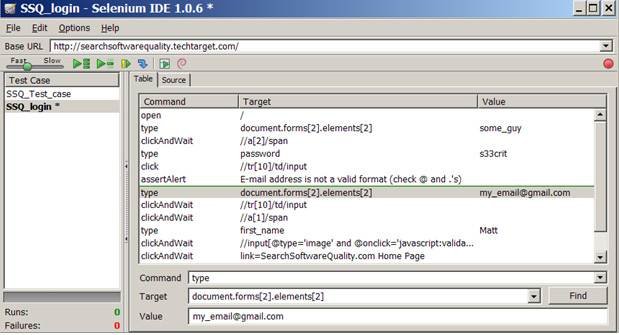
Sooner or later, you'll want to close your browser, and you'll likely want to get your file back next time you open it. From Selenium IDE use the File Menu to Save Test Case As and specify a filename. This will save to your hard drive for next time. Another option is to create a New Test Case and save that. Having more than one test case open at once shows us the test suite interface. This is just like the test case interface, except it shows the name of all the test cases loaded at left:
We can now run our tests collectively and save them as a suite. While for smaller apps you may be able to test the entire application in one suite, you'll likely want to break them up for larger applications. In that case, I suggest a test for each minor feature and a suite for each major feature, with each suite saved in a directory. That way, you can test major pieces one at a time. With multiple testers, you can put the entire system under version control, just like software code, and have multiple people working on tests at the same time.
This is just a quick introduction, but you can find a great deal of detail in the Selenium IDE documentation on-line. I've tried to hit the highlights and get you started quickly. Now I could end the tutorial and ride off into the sunset, but if you'll allow me, I've got a little bit more advice to give.
Beyond Selenium IDE
Once the thrill runs off of working with the IDE, you're faced with a few realities. The tool generally takes up your whole browser, and while it is faster, it really isn't that much faster than testing by hand. It always does the same thing, over and over again, and it doesn't have any of the features we look for in a programming language such as variables, looping and abstraction. So if you've got a technical team interested in doing some serious automation testing, I generally suggest moving from Selenium IDE to Selenium Remote Control, which can be programmed. If that tickles your fancy, read the two Selenium RC tutorials that we searched for in our test case. You have the basics. Now it's time to move to the next level.
No comments:
Post a Comment